In This Guide
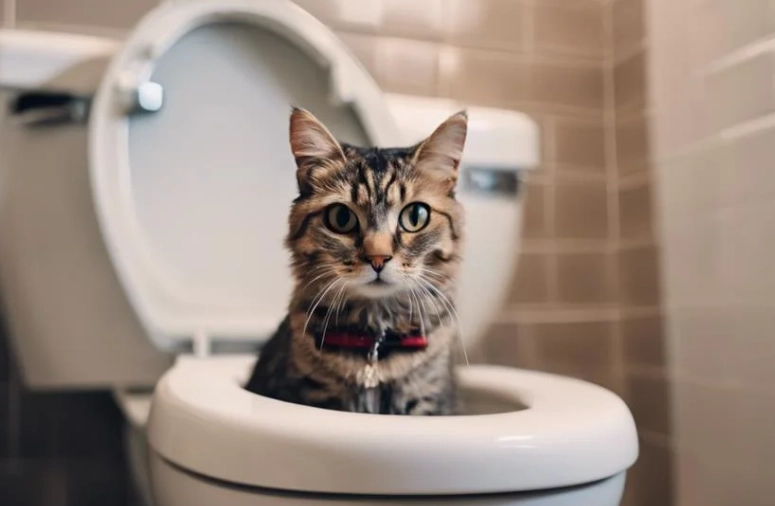
Let's be real for a second. Taking your dog to the professional groomer can feel like a luxury spa trip—for your wallet. It adds up fast. I remember looking at my bank statement one month after a routine visit for my Golden Retriever, Max, and just thinking, "There has to be another way." That's when I dove headfirst into the world of Dog grooming DIY. And guess what? It wasn't just about saving cash. It became this incredible weekly ritual that strengthened our bond in ways I never expected.
But here's the thing nobody tells you right away: starting out can feel overwhelming. Which brush? What shampoo? How do you even begin to trim those nails without causing a panic (for both of you)? I made my fair share of mistakes—like using a human conditioner that did nothing for his coat, or trying to use cheap clippers that just pulled his fur. Not great.
So, I've put together everything I wish I'd known from the start. This isn't about becoming a professional overnight. It's about gaining the confidence and know-how to keep your furry friend clean, comfortable, and looking sharp between those professional visits, or even replacing them entirely for basic care. We'll talk tools, techniques, safety, and how to turn a chore into quality time.
Why Bother with DIY Dog Grooming at Home?
Sure, saving money is the obvious one. A full professional groom can run you $50 to $100 or more, depending on your dog's size and coat. Doing it yourself cuts that cost to the price of supplies that last for months. But the benefits go way deeper.
For anxious dogs, the salon can be a stressful place. The noise of dryers, the presence of other dogs, being handled by strangers—it's a lot. At home, it's a calm, familiar environment. You can go at your dog's pace, take breaks, and use tons of treats. It builds trust.
Then there's the bonding. Grooming is a social activity for dogs. When you brush them, you're engaging in a behavior that mimics how they interact with each other. It's calming and reinforces your role as their caretaker. Max now brings me his brush sometimes. He associates it with attention and gentle touch.
You also get complete control. You choose the products, avoiding harsh chemicals if your dog has sensitive skin. You decide the style (within reason—please don't try intricate patterns without practice!). And you're there for every step, ensuring your pup is treated with patience.
The Non-Negotiable Dog Grooming DIY Toolkit
You don't need a salon's worth of equipment to start. A focused, quality kit is better than a drawer full of junk. Here’s the breakdown of what you actually need, categorized by priority. I've learned that investing in a few key items makes the whole process smoother and safer.
Essential Foundations (The Must-Haves)
These are the tools you'll use every single time. Don't skimp here.
- Slicker Brush: The workhorse for most coats. It's great for removing loose hair, preventing mats, and stimulating the skin. Look for one with fine, bent wires and a protective tip. A common mistake is brushing too hard—gentle strokes are key.
- Undercoat Rake or Deshedding Tool: If you have a double-coated breed like a Husky, Shepherd, or yes, my Golden, this is a lifesaver. It reaches the dense undercoat that the slicker brush can't. The American Kennel Club (AKC) has a good guide on coat types to help you figure out if your dog needs one.
- Steel Comb: This is your truth-teller. After brushing, run the comb through the coat, especially behind the ears, under the legs, and around the tail. If it glides through smoothly, you're done. If it snags, there's a mat you missed. A comb with both wide and fine teeth is versatile.
- Dog-Specific Shampoo & Conditioner: Human pH levels are different. Dog shampoo is formulated for their skin. Get one suited to their coat type—oatmeal for sensitive skin, moisturizing for dry coats, etc. Conditioner helps detangle and adds shine, making brushing easier later.
- Nail Clippers or Grinder: This is the part most owners dread. You have two main choices: guillotine-style or scissor-style clippers, or an electric grinder. Clippers are faster but risk a quick cut if you're not careful. Grinders are slower and noisier but allow for very precise, safe filing down. I switched to a grinder after a close call with clippers and will never go back.
Advanced & Situation-Specific Add-Ons
Once you're comfortable with the basics, these can expand your capabilities.
- Electric Clippers: For trimming hair on the body, paws, or sanitary areas. You don't need the most expensive pair. Look for a quiet model with multiple guard comb attachments. Clipping a whole coat is an advanced skill—start with just trimming paw pads and the sanitary area.
- Thinning Shears: These are scissors with teeth. They're magical for blending and creating a natural look when trimming around the face, ears, or tail. They remove bulk without leaving a harsh, scissor-cut line.
- Ear Cleaning Solution & Cotton Balls: A gentle, vet-approved ear cleaner is vital. Never use Q-tips deep in the ear canal. Just soak a cotton ball and wipe the parts of the inner ear you can easily see.
- Toothbrush & Dog Toothpaste: Dental care is grooming too! Enzymatic dog toothpaste and a soft brush or finger brush help prevent plaque and bad breath. Chicken or beef-flavored paste makes it easier.
| Tool Category | Specific Tool | Best For Dog Coat Type | Pro Tip / Warning |
|---|---|---|---|
| Brushing | Slicker Brush | All coats (Long, medium, short) | Brush in the direction of hair growth. Be gentle on bony areas. |
| Brushing | Undercoat Rake | Double coats (Huskies, Retrievers, Collies) | Use during shedding season. Don't use on a single-coated dog. |
| Brushing | Steel Comb | All, especially long & curly coats | Your final check for mats. Start from the tips, work to the skin. |
| Bathing | Rubber Bath Brush | Short-haired dogs | Massages skin and lifts dirt during the bath. Dogs usually love it. |
| Nail Care | Guillotine Clippers | Small to medium dogs with clear nails | Easier to see the quick. Blades must be kept sharp. |
| Nail Care | Rotary Nail Grinder | Anxious dogs, dark nails, all sizes | Introduce the sound slowly. Grind in short bursts to avoid heat. |
| Trimming | Thinning Shears | Furnishings on face, legs, tail | Never use on mats. Only for blending already brushed hair. |
See? It's not an endless list. A solid core kit gets you 90% of the way there.
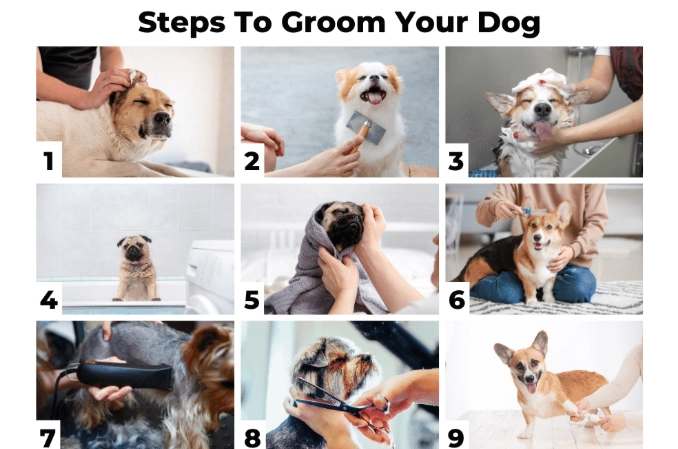
The Step-by-Step Dog Grooming DIY Routine
Alright, you've got your tools. Now, let's walk through a typical session. The order matters. You always want to brush before the bath, for example. A wet mat is an impossible mat.
Phase 1: The Pre-Bath Brush-Out
This is the most important step most people skip. Bathing a dog with loose hair and tangles just creates a wet, plastered-down mess that's harder to deal with later.
- Secure your dog. Use a non-slip mat on a table or in the tub. Have a leash or harness on them if they're wiggly. I put a yoga mat in my tub for Max.
- Start with the slicker brush. Work in sections. Do the back, sides, chest, and legs. Be thorough but gentle. Talk to your dog, give treats.
- Follow with the comb. This is your quality check. Pay special attention to high-friction areas: behind the ears, the armpits, under the collar, behind the back legs. If you find a small mat, you can sometimes gently work it apart with your fingers and the comb. For big, tight mats, you might need to carefully cut them out with blunt-tipped scissors, parallel to the skin. If it's severe, a vet or groomer is safer.
- Use the undercoat tool if needed. If it's shedding season and you have the right coat type, go over the brushed areas with your rake or deshedder. You'll be amazed at the fluff that comes out.
Phase 2: Bath Time (Without the Drama)
The goal here is efficiency and calm. Have everything within arm's reach: shampoo, conditioner, towels, a jug or detachable showerhead.
- Pre-rinse with lukewarm water. Not hot! Test it on your inner wrist. Thoroughly wet the coat all the way to the skin. Avoid the head/ears for now.
- Apply shampoo from neck down. Dilute it a bit with water in your hand to make spreading easier. Lather up the body, legs, and belly. Really massage it in. This feels good to them!
- Do the head last, carefully. Use a washcloth with diluted shampoo to wipe the face. Shield the eyes. For ears, just wipe the outer flap. Never shoot water or pour shampoo directly into the ear canal.
- Rinse, rinse, rinse. Incomplete rinsing is the #1 cause of itchy skin after a bath. Rinse until the water runs completely clear, not sudsy. Lift the fur to check the underlayer.
- Apply conditioner if using. Follow the same steps, then rinse thoroughly again.
- Squeeze out excess water. Gently press along the body. Don't wring.
Phase 3: Drying & The Final Touches
How you dry depends on your dog and tools.
- Towel Dry: Use several absorbent towels. A microfiber towel works wonders. Blot and squeeze; vigorous rubbing can cause tangles.
- Blow Dryer: If you use one, it MUST be on the coolest setting. Hot air can burn their skin. Keep it moving constantly and at a distance. This is great for fluffing up thick coats but can be scary for some dogs. Desensitize them slowly.
- Air Dry: For many dogs, this is fine in a warm room. Just keep them away from drafts until fully dry.
Once mostly dry, give them another light brush with the slicker and comb. The coat will be tangle-free and look amazing.
Now, the finishing touches:
- Ears: Moisten a cotton ball with ear cleaner. Wipe the visible part of the inner ear. Stop when you feel resistance. If you see redness, dark discharge, or smell an odor, consult your vet—it could be an infection.
- Nails: This is easier when they're calm post-bath. If using clippers, identify the quick (the pink inner part with blood vessels). In clear nails, it's visible. In black nails, it's hidden. Take off tiny slivers at a time. If you're nervous, just file the very tip with a grinder once a week. The ASPCA's grooming guide emphasizes the importance of regular, careful nail trims for paw health.
- Paws: Use small, blunt scissors or clippers with a guard comb to trim the hair between the paw pads and around the feet. This gives better traction and keeps snow/ice from balling up.
Navigating Common Dog Grooming DIY Challenges
It won't always be smooth sailing. Here's how to handle the tricky bits.
The Anxious or Wiggly Dog
Start slow. Your first few sessions might just be touching them with the brush for 30 seconds, then a treat. Next time, one stroke. Build positive associations. Use a lick mat smeared with peanut butter or yogurt stuck to the wall of the tub. It's a game-changer. If they're truly petrified of one thing (like nail trimming), don't force a full session. Do one paw, then stop. Success is measured in calmness, not completion.
Dealing with Skunk, Mud, or Other Messes
For skunk, the old tomato juice thing is a myth. A more effective DIY solution is a mix of 1 quart 3% hydrogen peroxide, 1/4 cup baking soda, and 1 teaspoon of liquid dish soap. Important: Mix this in an open container (it can expand), use immediately, avoid eyes, and rinse thoroughly. It neutralizes the odor. For general dirt, a pre-bath brush and a thorough rinse usually do the trick. For really muddy paws, a simple paw soak in warm water before they enter the house saves your floors.
"To Shave or Not to Shave?" (The Double-Coat Dilemma)
This is a huge debate. For double-coated breeds (Huskies, Malamutes, German Shepherds, Golden Retrievers), their coat is a complex insulation system. The undercoat traps air to keep them cool in summer and warm in winter. Shaving it off can ruin the coat's ability to regulate temperature, and it may not grow back correctly. It also exposes their skin to sunburn. The proper Dog grooming DIY approach for these breeds is not shaving, but aggressive deshedding with the right rake and brush to remove the loose undercoat. If you're considering a shave for health or comfort reasons, have a serious chat with your vet or a trusted groomer first.
Your Dog Grooming DIY Questions, Answered
I get asked these all the time by friends who are starting out.
Wrapping It Up: Your Path to Confident Home Grooming
Starting your Dog grooming DIY journey can feel like a lot. I remember staring at the brushes in the pet store, completely lost. But you start with one thing. Maybe this week, you just master brushing. Next week, you try a bath. The week after, you attempt one nail with the grinder.
The goal isn't perfection. It's progress. It's about building a routine that keeps your dog healthy and strengthens your connection. You'll save money, sure. But you'll also gain this intimate knowledge of your companion—the feel of their coat, the normal look of their skin, the rhythm of their shedding seasons.
You'll have frustrating moments. The shampoo bottle will slip, you'll miss a mat behind an ear, the dog will shake muddy water all over you mid-bath. Laugh it off. It's part of the story.
The real reward of Dog grooming DIY isn't a perfectly coiffed show dog. It's the quiet moment after, when your clean, brushed, and content dog sighs and leans against you. That trust, earned through your own hands, is worth more than any groomer's bill.
Grab that slicker brush, a handful of treats, and just start. Your dog—and your wallet—will thank you for it.
Join the Conversation