Quick Navigation
- Gearing Up: What You Really Need (And What's Just Nice to Have)
- The Pre-Groom: Setting the Stage for Success
- How to Groom a Dog with Clippers Step by Step: The Main Event
- Post-Clipping Care and Cleanup
- Navigating Common Problems and Breed-Specific Nuances
- Wrapping It Up: Confidence Comes with Practice
Let's be honest, the thought of buzzing away at your dog's fur with a loud machine can be pretty intimidating. I remember the first time I tried it on my own Golden Retriever, Charlie. I was convinced I was going to give him a lopsided haircut he'd be embarrassed about for weeks. But you know what? It went okay. Not perfect, but okay. And over the years, it's become a regular, almost relaxing routine for both of us.
The truth is, learning how to groom a dog with clippers step by step is a skill any dedicated pet owner can pick up. It saves you a ton of money on professional groomer visits (which can easily run over $70 a pop), and it's a great bonding experience. More importantly, it gives you full control over your dog's comfort and hygiene.
This guide isn't about turning you into a master groomer overnight. It's about giving you the clear, practical, and safe steps to confidently groom your dog at home. We'll cover everything from the gear you absolutely need to the final brush-out, including those tricky areas everyone worries about.
Gearing Up: What You Really Need (And What's Just Nice to Have)
Before we even think about turning the clippers on, let's talk tools. Using the wrong clipper on a thick-coated dog is a recipe for frustration, a hot blade, and a stressed-out pup.
The Clippers: Corded vs. Cordless
This is your biggest decision. For most home users, a good quality corded clipper is the workhorse. They provide consistent power, which is crucial for getting through dense or matted fur without the motor bogging down and pulling. The downside? The cord can be a nuisance, tangling around you and the dog.
Cordless clippers offer fantastic freedom of movement. They're quieter, which some dogs prefer. But you have to watch the battery life. Nothing worse than the clippers dying halfway through a groom. If you go cordless, get a model with a long battery life and maybe even a quick-charge feature.
My personal take? I started with a corded Andis or Wahl (the two big brands groomers trust) and later invested in a cordless model for touch-ups and sensitive areas. You don't need the absolute top-of-the-line pro model, but don't buy the cheapest $20 pet store clipper either. It'll die on you.
Blades and Guide Combs
This is where most beginners get confused. The clipper itself is just the motor. The blade attached to it determines how short the cut will be.
- #10 blade: The most common. It leaves about 1/16" of hair. It's great for sanitary areas (under the tail, groin), paw pads, and for dealing with matted fur you need to remove entirely. It's also the go-to for a very short summer cut on many breeds.
- #7 or #7F blade: Leaves about 1/8" of hair. A good all-purpose blade for a short, neat trim on the body.
- #4 or #5 blade: Leaves 1/4" to 3/8". Perfect for a longer short cut, often used on double-coated breeds where you don't want to shave too close.
Then you have guide combs (or attachment combs). These snap onto a #30 or #40 blade (which you usually buy separately) and let you cut to a specific, longer length. A #3 comb might leave an inch of hair, a #1 comb about 1/2 an inch. They're safer for beginners because they prevent you from accidentally cutting too short.
| Tool | Best For | Beginner Friendliness |
|---|---|---|
| #10 Blade | Sanitary trims, paw pads, severely matted fur | High (but use with caution on the body) |
| #5 Blade | General body clipping on many breeds | High |
| #4 Blade with Guide Comb | Creating a uniform, longer length all over | Very High (the comb guards the skin) |
| Thinning Shears | Blending lines, softening edges, trimming feathering | Medium (requires practice) |
The Supporting Cast
Clippers are useless on a dirty, tangled coat. You'll need:
- A good dog shampoo and conditioner: Bathe and fully dry your dog before clipping. Clipping a dirty coat will dull your blades instantly.
- Slicker brush and metal comb: Brush thoroughly after the bath, down to the skin. The comb should glide through without catching on any knots. If it catches, you have a mat that needs special attention.
- Blade coolant and lubricant: Non-negotiable. Spray coolant on the blade every 5-10 minutes to keep it from burning your dog. Apply lubricant after cleaning to keep the blades sharp.
- Styptic powder or pencil: In case you nick a quick while trimming nails (a separate but related task).
- Non-slip mat: For the table or floor. A slipping dog is a scared, and potentially injured, dog.
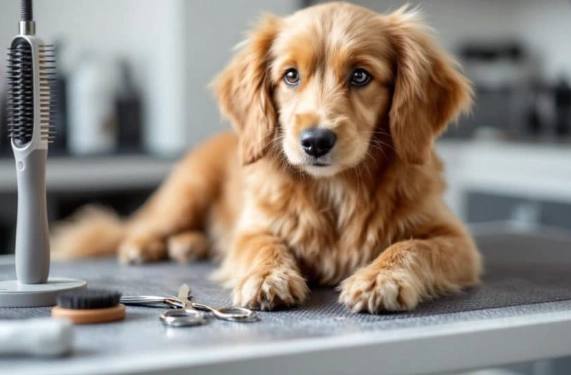
The Pre-Groom: Setting the Stage for Success
Rushing into the clipping is the biggest mistake. The prep work determines 80% of how smooth the actual grooming will go.
First, give your dog a proper bath. I mean a thorough one. Get all the dirt and old oils out. A clean coat is easier to cut and is kinder to your blades. After the bath, dry them completely. I'm talking bone-dry. Clipping a damp dog is a nightmare—the hair clumps, the blade skips, and you get an uneven, choppy cut.
While they're drying, set up your space. I do it in the bathroom or kitchen, somewhere easy to clean. Put down that non-slip mat. Have all your tools laid out: clippers, blades, brush, comb, treats, everything. You don't want to be searching for a guide comb with a half-trimmed, wiggly dog on the table.
Now, the brush-out. This is tedious but cannot be skipped. Use the slicker brush first to break up any undercoat, then follow with the metal comb. Work in sections. If you hit a mat, don't just yank it or try to clip over it. A mat is a tight knot of hair that pulls directly on the skin. Try to gently work it apart with your fingers and the comb. If it's severe, you might have to carefully cut it out with scissors parallel to the skin, not pointed into it. Or, use your #10 blade to shave it out.
A well-brushed coat is the secret to a professional-looking finish.
How to Groom a Dog with Clippers Step by Step: The Main Event
Alright. Dog is clean, dry, brushed, and calm(ish). You're prepped. Let's get into the actual process of how to groom a dog with clippers step by step. We'll go from head to tail, covering the common trouble spots.
Step 1: The Calm Introduction
Don't just fire up the clippers and go for it. Let your dog sniff the turned-OFF clippers. Give a treat. Turn them on at a distance, let them hear the buzz, give another treat. Touch their back or shoulder with the side of the cool, running clipper. Treat. This positive association is huge, especially for a first-timer.
Step 2: Starting with the Body
I always start on the back, behind the shoulders. It's a flat, easy area and gets both you and the dog used to the process. Hold the clipper like a pencil, but let its weight do the work. Don't press down. Use your other hand to stretch the skin flat in front of the clipper's path.
Direction is key. For the best results, clip with the direction of hair growth (usually head to tail). Going against the grain gives a closer cut but is more likely to cause irritation or clipper burn. For a first groom, go with the grain.
Use long, smooth, overlapping strokes. Imagine you're mowing a lawn in straight lines. Don't go in random patches. Start at the top of the back and work down the sides. You'll be following a clear how to groom a dog with clippers step by step pattern that ensures even coverage.
Step 3: The Tricky Areas - Legs, Chest, and Belly
This is where it gets fiddly. The skin on the belly and inner legs is looser and more sensitive.
- Legs: For the legs, many people prefer to use a longer blade or guide comb than they used on the body for a more natural look. Carefully stretch the leg out and clip from the top down, going around the circumference. Be extra careful around the bony front of the wrist (the "knee").
- Chest: Have your dog sit. The chest fur often grows in different directions. Gently lift the front legs one at a time to get the armpit area. Go slowly here; it's a ticklish spot for many dogs.
- Belly: This is a prime area for mats, especially in long-haired dogs. For males, be extremely cautious around the sheath. For females, avoid the nipples. I often use my free hand to flatten the skin and gently guide the clippers around these sensitive spots. A #10 blade is standard here for hygiene, but you can use a longer blade if you prefer.
Step 4: The Head, Neck, and Ears
Proceed with extreme caution. Many owners choose to scissor-trim the head and just use clippers on the neck. If you do clip the head:
- Use a very quiet clipper or cordless model.
- Use a longer guide comb (#3 or higher) for safety.
- Hold the muzzle closed gently but firmly.
- Clip from the back of the head towards the nose, avoiding the eyes, lips, and whiskers.
For the neck, clip from the base of the skull down towards the shoulders, following the lay of the coat. For the ears, if you're trimming the edges or the hair on the leather, fold the ear flat against the head and trim carefully around the edge. Never insert the clipper into the ear canal.
Step 5: The Sanitary Trim and Tail
This is non-negotiable for hygiene and comfort. Use a clean, sharp #10 blade.
- Under the tail: Lift the tail gently. Shave in a circular motion around the anus, removing all hair that could trap feces.
- Groin/Belly: Continue from the belly shave to create a clean, clear path for urine, especially for females.
- Tail: Some people clip the entire tail with the same blade as the body. Others just tidy up the base or underside. It's a style choice.
Following this detailed sequence on how to groom a dog with clippers step by step will methodically get the job done. Stop frequently to give your dog a break and a treat. A 30-minute grooming session with breaks is better than a frantic 15-minute one.
Post-Clipping Care and Cleanup
You're not done when the buzzing stops. Give your dog a final, light brush with the slicker brush to remove any loose cut hairs. I sometimes give Charlie a quick wipe-down with a damp cloth to get rid of that "hair dust" feeling.
Now, care for your tools. This extends their life dramatically. Use the small brush that came with your clippers to whisk all the hair out of the blade teeth. Then, apply a few drops of clipper oil to the blade's teeth and turn the clippers on for a few seconds to let it distribute. Wipe off any excess.
Your dog might be a little itchy as the short hairs prick their skin. This is normal. Keep an eye on them for a day or two for any signs of redness or irritation (clipper burn). An oatmeal-based soothing spray can help.
Navigating Common Problems and Breed-Specific Nuances
Not all dogs are created equal when it comes to clipping. Here's where that "step by step" knowledge gets applied to real-world challenges.
Dealing with a Wiggly or Anxious Dog
This is the number one hurdle. If your dog is super anxious, don't force a full groom in one day. Break it up over several sessions. Day 1: just the back. Day 2: the legs. Use high-value treats (cheese, chicken) and keep sessions short and positive. A fear-free approach, as advocated by the American Veterinary Medical Association, is just as important at home as it is at the vet.
To Shave or Not to Shave Double-Coated Breeds?
This is a massive debate. Breeds like Huskies, Golden Retrievers, and German Shepherds have a dense undercoat and a protective topcoat. The general consensus from experts, including the American Kennel Club (AKC), is that you should not shave them down to the skin. It can permanently damage their coat's ability to regulate temperature and protect from sunburn. Instead, use a long guide comb (#3 or #4) for an overall tidy-up, and focus on using an undercoat rake and slicker brush to remove the loose undercoat. The process of how to groom a dog with clippers step by step for these breeds is more about careful thinning and shaping than a full shave.
Puppies and Senior Dogs
Puppies have sensitive skin and are easily frightened. Make their first clipper experience incredibly positive and brief—just a few strokes on the back. Senior dogs may have thin skin, arthritis, or lumps. Be extra gentle, use a longer blade, and avoid putting pressure on sore joints.
Your Dog Clipping Questions, Answered
Wrapping It Up: Confidence Comes with Practice
Learning how to groom a dog with clippers step by step is a journey. Your first attempt will not be perfect. My Charlie's first haircut was... let's call it "rustic." But it was functional, he was comfortable, and I saved $80.
The key takeaways? Prep is everything. The right tools make the job possible. Go slow, be safe, and prioritize your dog's comfort over achieving a show-ring finish. Follow this guide, refer back to it, and with each session, you'll both become more confident.
You're not just cutting hair; you're taking an active role in your dog's wellbeing. And there's something deeply satisfying about that. Now, go give your pup a treat—they've earned it just for reading about this with you.


Join the Conversation