Let's cut to the chase. The most common answer you'll find online is "daily spot cleaning and weekly deep cleaning." That's a decent starting point, but if you treat it as a rigid rule, you might be setting up your bird for health problems or yourself for a miserable, smelly battle. After years of caring for everything from tiny finches to a chatty Amazon parrot, I've learned that cage cleaning frequency is a dynamic equation, not a calendar reminder. The real answer depends on your specific bird, its habits, and your home environment. Get it wrong, and you're looking at potential respiratory issues, bacterial infections, and a pet that's stressed in its own home.
Your Quick Cleaning Roadmap
What Really Determines Your Cleaning Schedule?
Think of these as the variables in your cleaning formula. Ignore them, and your schedule is just a guess.
Bird Size and Species is Your #1 Factor
A budgie (parakeet) and a cockatoo are worlds apart in mess production. Larger birds like macaws, cockatoos, and African Greys have more powerful digestive systems and larger droppings. They also tend to be more destructive with their toys and food, creating more debris. A small finch cage might get by with a lighter weekly clean, while a large parrot cage often needs a partial deep clean every 4-5 days to stay ahead of the mess. Watery droppings from species like lories or lorikeets demand near-constant vigilance.
The "Flock Factor" and Cage Size
Two birds are not twice the mess—they can be three or four times the mess, especially if they squabble and fling food. More birds mean exponentially more waste and faster contamination of food and water. Conversely, a spacious cage or aviary gives waste more room to disperse away from perches and food bowls, potentially stretching the time between deep cleans slightly. A cramped cage becomes toxic much faster.
Diet: The Hidden Mess Maker
This is a huge one most beginners miss. What goes in directly affects what you have to clean up.
- Fresh Foods (Veggies, Fruits): Wonderful for health, but they spoil quickly and create sticky, bacterial-prone messes. Cages of birds on fresh diets need their food areas and cage floors under those areas cleaned daily, without fail.
- Pelleted Diets: Generally result in firmer, less odorous droppings and less powdery waste compared to seed mixes.
- Seed Mixes: Birds hull seeds, leaving shells everywhere that can hide waste and mold. The dust from seeds can also coat surfaces and clog air filters.
My Amazon, Paco, loves blueberries. The day after blueberry day is always a more intensive wipe-down of his perches and the walls nearby. You just learn to anticipate it.
Your Bird's Health and Habits
A sick bird often has looser, more frequent droppings. During illness, you might need to switch to a twice-daily spot clean protocol to monitor output and keep the environment sterile. Some birds are naturally "neater," pooping mostly in one area. Others, like my friend's conure, seem to aim for the walls. Bathing frequency also matters—a bird that bathes often flickes water and damp feathers, which can accelerate rust and mildew in corners.
The Bottom Line: There is no universal schedule. You must observe and adapt. A good rule of thumb is: if you can smell the cage from a few feet away, you've already waited too long. Your bird's nose is far more sensitive.
Your Action Plan: Daily, Weekly & Monthly Tasks
Here’s a flexible framework you can adjust based on the factors above. This is what I follow for my single, medium-sized parrot.
| Frequency | Core Tasks (Non-Negotiable) | Pro-Tip / Why It Matters |
|---|---|---|
| Daily (Every Single Day) | Change water (scrub bowl). Remove soiled floor paper/debris. Wipe off obvious poop from perches & cage bars. Remove uneaten fresh food. | Water is a bacteria superhighway. Changing it is the most important daily task. Use a dedicated brush for the bowl. |
| Weekly (Every 5-7 Days) | Full cage paper/tray liner change. Remove and wash all perches, toys, food bowls in bird-safe soap. Scrub tray/grate. Wipe down interior bars. | This prevents biofilm buildup—a slimy layer of bacteria that daily wiping misses. It’s where most odors originate. |
| Monthly / Bi-Monthly | Full cage breakdown and deep disinfection. Move cage to cleaning area. Inspect for rust, loose parts. Soak and disinfect all removable items. | This is your chance to catch wear and tear and prevent permanent staining or damage to the cage itself. |
Notice I said "scrub" the water bowl daily. A quick rinse isn't enough. That slimy feeling? Biofilm. A study in the Journal of Avian Medicine and Surgery has highlighted the role of contaminated water sources in avian bacterial infections. It's that important.
How to Execute a Proper Deep Clean (Safely)
This is where most people either under-do it or use dangerous chemicals. Here's my field-tested method.
Step 1: Bird Relocation. Move your bird to a completely separate, safe room. Not just across the room. Fumes and stress are real. A travel cage or a secure perch in the bathroom works.
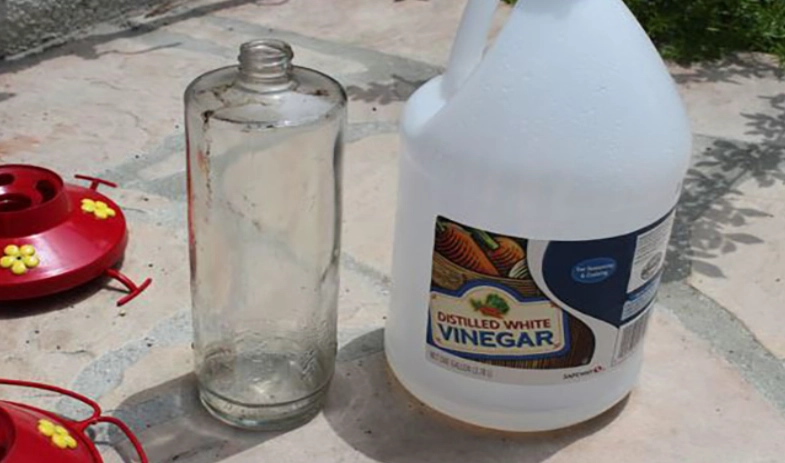
Step 2: Strip and Soak. Remove every single item—toys, perches, bowls, swings. Soak them in a tub or sink with hot water and a few drops of dawn dish soap or a dedicated avian cage cleaner. For mineral deposits (from hard water or dried fruit), a 50/50 mix of white vinegar and water works wonders. Let it sit.
Step 3: The Cage Scrub. Take the empty cage outside or into a shower/tub. Vacuum out all dust and debris. Then, scrub every square inch with hot, soapy water and a dedicated brush. Focus on corners, grate bars, and the tray. A toothbrush is great for hinges and small crevices.
Step 4: The Rinse & Disinfect Debate. Rinse everything thoroughly with clean water. For disinfection, avoid bleach sprays or household cleaners near the cage. Residue is deadly. Instead, use a solution specifically labeled safe for bird cages, or a diluted veterinary disinfectant like F10SC. Follow dilution instructions exactly. The key is to let it sit for the recommended contact time, then rinse again obsessively and let it air dry completely in the sun if possible.
Step 5: Reassembly with a Fresh Eye. As you put it back together, wipe down the now-clean perches and toys before returning them. This is the perfect time to rearrange things for mental stimulation. Use fresh, plain paper (newspaper with soy ink, butcher paper, paper towels) on the tray. Avoid corn cob, walnut shell, or other "natural" litters—they can mold and are impossible to monitor droppings on.
Beyond Cleanliness: The Health & Behavior Impact
We clean to avoid smell, sure. But the stakes are much higher.
A dirty cage is a breeding ground for Aspergillus fungus and bacteria like E. coli and Pseudomonas. Birds have extremely sensitive respiratory systems. Inhaling ammonia from urine and dust can lead to chronic respiratory disease, a leading cause of vet visits. I've seen birds develop plucking habits simply because they were stressed by their filthy environment—they couldn't get away from their own waste.
Conversely, a clean cage directly supports immune function. It also makes it infinitely easier for you to monitor your bird's health. You can spot changes in droppings, undigested food, or signs of illness immediately on a fresh paper liner. It's your early warning system.
Solving Common Bird Cage Cleaning Dilemmas
Cleaning isn't just a chore; it's a fundamental part of avian stewardship. By tuning into your bird's specific needs and moving beyond a one-size-fits-all schedule, you create a foundation for a longer, healthier, and happier life together. Start by observing your bird's mess patterns tomorrow. You might be surprised at what you learn.


Join the Conversation