Quick Navigation
Let's be honest, the first time I tried to groom my own dog, it was a disaster. A wet, soapy, slightly traumatizing disaster for both of us. Charlie, my Labrador, looked at me like I'd betrayed him, and I ended up with more water on me than on him. That's why I wanted to write this. Not as a professional groomer (I'm not), but as someone who's made every mistake in the book and finally figured out a system that works. A real, practical, dog grooming step by step guide for regular pet parents who want to save some money and bond with their furry friend, without the stress.
Grooming isn't just about making your dog look pretty for Instagram. It's fundamental health care. Regular brushing finds lumps, bumps, and ticks you might miss. Clean ears prevent nasty infections. Proper nail trims save their joints from pain. Doing it yourself means you know your dog's body intimately, catching potential issues early. Plus, let's not forget the cost—professional grooming adds up fast.
This guide is broken down into the actual sequence you should follow. We'll talk tools, prep, and the exact step-by-step dog grooming process, from brush to finish. We'll also tackle the scary parts (nails, I'm looking at you) and answer the questions that kept me up at night.
Before You Start: The Grooming Toolkit & Mindset
Jumping in with the wrong tools is the fastest way to fail. Using a human hairbrush on a Poodle? Useless. Trying to cut matts with scissors? Dangerous. Your toolkit depends hugely on your dog's coat type, but let's cover the universal basics.
Essential Tools for Every Dog Owner
You don't need a salon's worth of gear. Start with these:
- Slicker Brush: The workhorse. Great for removing loose hair and tangles in most coats. Get one with flexible pins.
- Undercoat Rake or Deshedding Tool: Non-negotiable for Huskies, Shepherds, Retrievers—any dog with a thick undercoat. This gets the dead fur out before it hits your couch.
- Steel Comb: The truth-teller. After brushing, run a comb through. If it glides smoothly, you're done. If it snags, there's still a tangle. A must for curly or long hair.
- Dog-Specific Shampoo & Conditioner: Human shampoo strips their skin's natural oils, leading to dryness and irritation. Get a gentle, pH-balanced dog formula. For specific issues (itching, whitening), you can get specialized ones later.
- Nail Clippers or Grinder: Guillotine-style or scissor-style clippers work. A grinder (like a Dremel) files nails down and is great for dogs scared of the "clip" sound, but it can be noisy.
- Ear Cleaning Solution & Cotton Balls: Not Q-tips! Never stick anything into the ear canal.
- Toothbrush & Dog Toothpaste: Chicken or beef flavored. Never use human toothpaste (it's toxic to them).

Setting the Stage for Success
Your dog's mood dictates everything. Grooming a frantic dog is miserable.
Choose a time when they're naturally calm, maybe after a walk when they've burned off some energy. Have all your tools laid out and within reach—fumbling for clippers while holding a wiggly dog never ends well. Prepare your space: a bathroom, utility sink, or even outdoors if it's warm. Have plenty of towels ready.
Most importantly, stock up on high-value treats. Small, soft, and smelly is best. You're going to reward calm behavior constantly. This turns grooming from a scary chore into a positive, treat-filled experience.
I used to just drag Charlie into the bath. Now, I call him, show him the treats, and let him sniff the brushes. The difference in his cooperation is night and day.
The Complete Dog Grooming Step-by-Step Process
Here is the golden sequence. The order matters because you want to do the messiest, wettest stuff in the middle, and you never want to bathe a dog with mats or loose hair—it just turns them into a wet, felted mess.
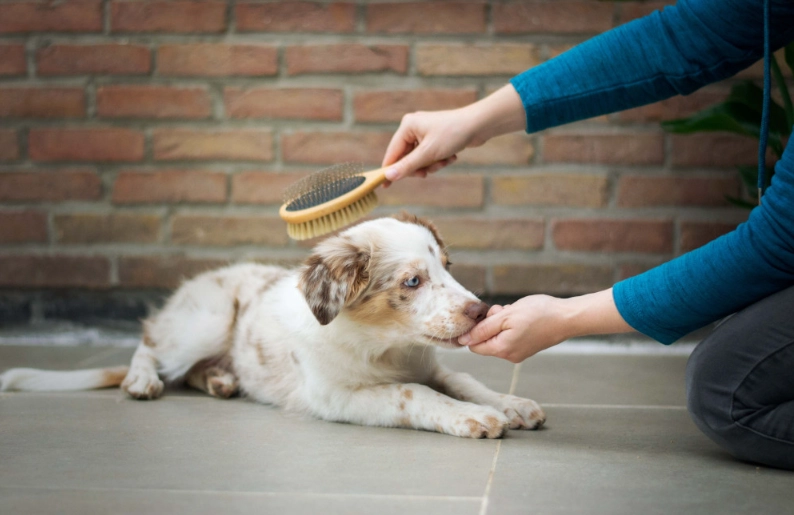
Step 1: The Pre-Bath Brush-Out
This is the most important step most people skip. Always brush thoroughly before the bath. Water will tighten any existing knot or matt, making it ten times worse and potentially painful to remove later.
Start with your slicker brush, working in sections. Brush in the direction of hair growth, not against it. For long-haired dogs, hold a section of hair at the root to avoid pulling their skin. After the slicker, go over the entire coat with your steel comb. If you hit a snag, work it out gently with your fingers or the comb before continuing. For heavy shedders, use your undercoat rake now. You'll be shocked at the amount of fur that comes out.
This initial brush-out is the foundation of your entire dog grooming step by step routine. Do it right, and everything else gets easier.
Step 2: Secure & Calm Your Dog
Get them into the tub or onto your stable surface. Use a leash clipped to something secure if needed, or an assistant. Talk in a calm, happy voice. Smear a bit of peanut butter on the wall of the tub or use a lick mat to keep them occupied. The goal is positive association.
Lukewarm water is key. Test it on your inner wrist—it should feel comfortably warm, not hot. A strong spray from the showerhead can be frightening. I use a detachable showerhead with a gentle setting, or a large plastic cup to pour water. Start at their feet and legs, slowly working up to the body and back. Avoid blasting water directly into their face, ears, or eyes.
Step 3: The Bath Itself
Wet them down completely, right to the skin. Apply your dog shampoo, diluting it a bit with water in your hand first. Lather it up all over, massaging gently. Don't forget the belly, armpits, and under the tail. Let the shampoo sit for a few minutes (check the label) to do its work.
Now, rinse. And I mean rinse thoroughly. Residue left behind is the number one cause of itchy skin after a bath. Rinse until the water runs completely clear, parting the coat to check the skin. This takes longer than you think.
If using conditioner, apply it now, mainly to the ends of the hair, avoiding the skin area if your dog is prone to grease. Rinse thoroughly again.
Step 4: The Dry-Down
Gently squeeze excess water from their coat. Don't rub vigorously with a towel—this can cause tangles in long hair and isn't great for the hair cuticle. Instead, blot and squeeze.
For most dogs, air-drying is fine in warm weather. For thick-coated or long-haired dogs, or in cooler climates, you'll need a dryer. A high-velocity pet dryer is amazing but expensive. A human hair dryer on the coolest, lowest setting can work if your dog tolerates the noise—keep it moving and never hold it too close. Brushing while blow-drying (line brushing) gives the smoothest, most professional finish.
Charlie hates the sound of the dryer, so I towel him well and let him do a few crazy "zoomies" around the house to shake off the rest. Not perfect, but it works for us.
Step 5: The Detail Work (Ears, Nails, Teeth)
Once they're mostly dry, it's time for the finer points of the step by step dog grooming process.
Ears: Check for redness, bad odor, or excessive dark wax—signs of an infection. Pour a little vet-approved ear cleaning solution into the ear canal (don't let the tip of the bottle touch the ear), gently massage the base of the ear for 20 seconds, and then let them shake. Use a cotton ball to wipe clean the parts of the outer ear you can see. Never probe deeper.
Nails: The big fear. The goal is to trim the tip without hitting the "quick"—the pink, blood-filled nerve inside the nail. In light nails, you can see it. In black nails, you can't. Trim small amounts, frequently. Look at the cut nail head-on after a clip; if you see a black dot in the center, you're nearing the quick. Stop. If you do nick the quick, have styptic powder or a styptic pencil on hand to stop the bleeding. It happens to everyone. A grinder lets you slowly file down to a safe length without the risk of a big cut.
The American Kennel Club has a great visual guide on how to trim dog nails safely that I still reference sometimes.
Teeth: Lift the lip and brush in small circles, focusing on the outer surfaces where plaque builds up. Start with just a few teeth and work up to more. Even a partial brushing is better than none. The Veterinary Oral Health Council (VOHC) lists accepted products that actually work, which is helpful when you're staring at a wall of options at the pet store.
Step 6: The Final Brush & Inspection
Give them one final, luxurious brush with a clean slicker or bristle brush. This removes any last bits of loose hair and distributes natural oils. As you brush, run your hands over their entire body. Feel for any new bumps, lumps, hot spots, or tender areas. Check between toes, under collars, and in skin folds. This hands-on check is a powerful health screening tool.
And you're done! Reward with a fantastic treat and lots of praise.
Tailoring Your Approach: Coat Type Matters
A one-size-fits-all approach doesn't work. Here’s a quick breakdown of focus areas for different coats. The International Professional Groomers Association (IPG) emphasizes that understanding coat type is the first rule of professional grooming, and it applies at home too.
| Coat Type | Key Tools | Biggest Challenge | Frequency Tip |
|---|---|---|---|
| Smooth/Short (Boxer, Beagle) | Rubber curry brush, shedding blade. | Shedding seems never-ending. | Weekly brushing with a curry brush grabs dead hair brilliantly. |
| Double/Heavy (Husky, German Shepherd) | Undercoat rake, deshedding tool, slicker. | Blowing coat & matts near thighs. | Daily during shedding season! The rake is your best friend. |
| Long/Silky (Yorkshire Terrier, Maltese) | Pin brush, wide-tooth & fine-tooth combs. | Tangles forming daily, especially behind ears. | Brush and comb daily to prevent mats. Keep hair trimmed around rear for hygiene. |
| Curly/Wiry (Poodle, Bichon, Terriers) | Slicker brush, steel comb (fine & coarse). | Mats form invisibly at the skin. | Brush/comb down to the skin every other day. Regular professional clipping often needed. |
Answering Your Top Dog Grooming Questions

Common Mistakes to Avoid (I've Made Them All)
- Bathing a matted dog: As covered, this is a cardinal sin. Brush first, always.
- Getting water in the ears: This can lead to infections. Place cotton balls gently in the ear canal (don't push them in!) before the bath to block water.
- Using dull clipper blades or nail clippers: Dull tools pull hair and crush nails instead of cutting cleanly, causing pain. Keep blades sharp.
- Rushing: This is when accidents happen. Set aside a good 1-2 hours when you're not stressed.
- Neglecting the "happy place": If your dog is terrified, stop. End on a positive note with a treat, even if you didn't finish. Forcing them through fear will make next time worse.
Mastering dog grooming step by step is a journey, not a one-time event. You'll get better each time. Your dog will learn to trust the process. The bond you build during these quiet, caring sessions is just as valuable as the health benefits. Start slow, be kind to yourself and your pup, and celebrate the small victories—like a successful nail trim or a tangle-free brush session.
It's not about perfection. It's about care. And maybe saving a few bucks on groomer visits to spend on extra toys instead.

Join the Conversation